Phone Setup
How to Set Up a Travel eSIM on iPhone Before You Fly
Use this esim for iphone travel setup guide to install, label, switch data, avoid roaming charges, and fix activation issues.
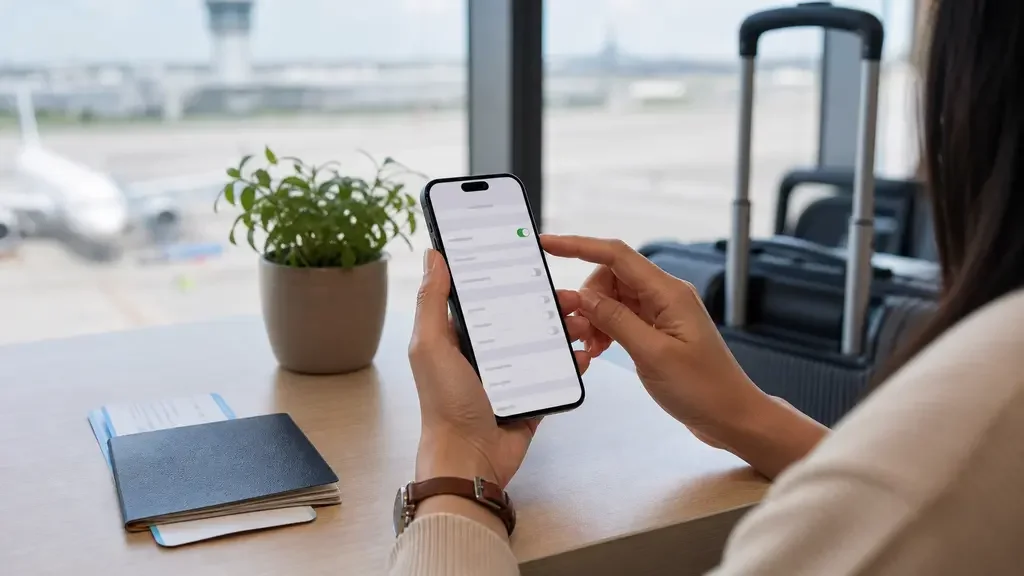
A good esim for iphone travel setup starts before you leave home, while you still have steady Wi-Fi and time to fix mistakes. The goal is simple: keep your regular number available for calls and texts, then send mobile data through the travel eSIM once you land.
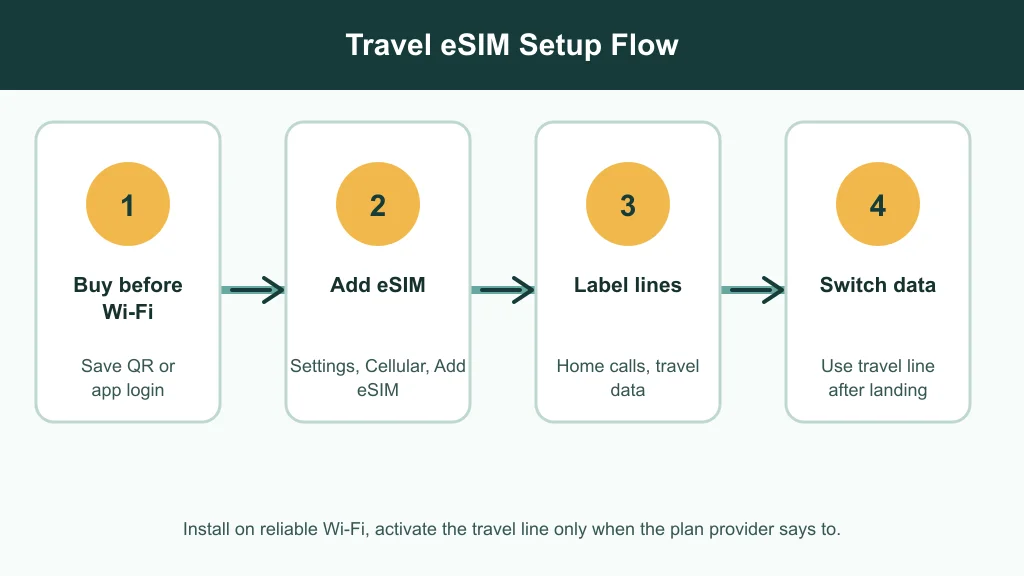
Honestly, most setup problems come from rushing the last three taps at the airport. Buy the plan, install it, label it clearly, and decide exactly when it should become your data line.
| What you see | Likely cause | First move |
|---|---|---|
| No Add eSIM option | Unsupported model, regional limitation, or carrier lock | Check model support and carrier lock status before buying a plan |
| QR code will not scan | Camera cannot read the code or the code is already used | Use the provider app or manual details if available |
| Installed but no data | Wrong line selected for cellular data | Set Cellular Data to the travel eSIM after arrival |
| Home carrier charges appear | Primary line data roaming stayed on | Turn off data roaming on the home line |
What You Need Before You Start
- Set aside 10 minutes. Use reliable Wi-Fi, not a weak hotel lobby network or airport hotspot that keeps dropping you.
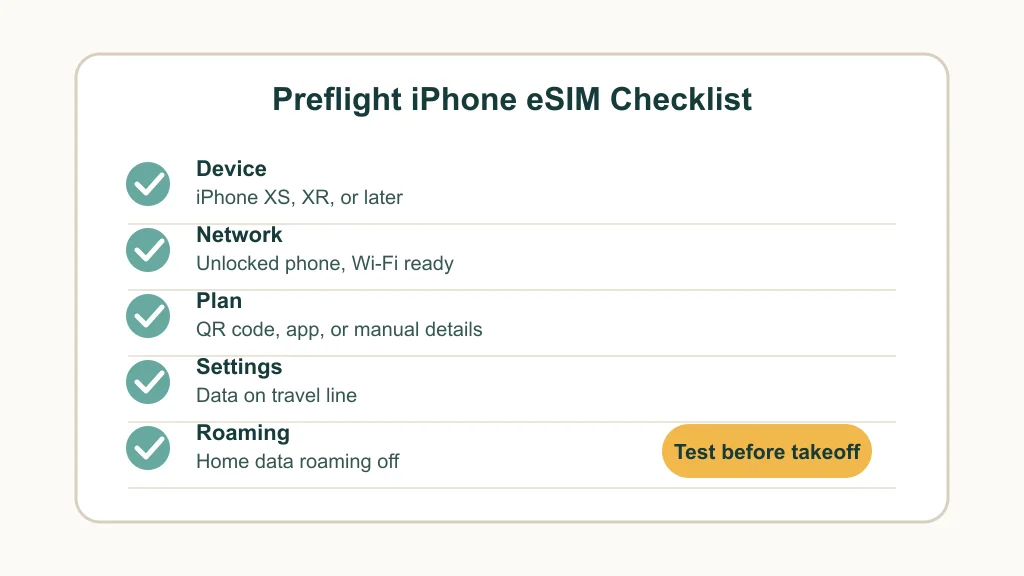
- Confirm your iPhone model. Apple says eSIM setup needs an iPhone XS, iPhone XS Max, iPhone XR, or later, and a carrier or worldwide provider that supports eSIM.
- Check that your iPhone is unlocked. A locked phone may refuse a travel eSIM from another provider, even when the QR code is valid.
- Keep your provider instructions open. Some plans activate as soon as installed, while others should be installed before departure and switched on only after landing.
Step 1: Buy the Plan and Save the Activation Details
Estimated time: 3-5 minutes. Choose a travel eSIM that matches your destination, trip length, hotspot needs, and expected data use. For route-specific help, compare a destination guide such as best eSIM for Europe travel, Japan from Canada eSIM options, Europe from Canada roaming alternatives, Mexico travel eSIMs, Turkey travel eSIMs, USA tourist eSIMs, or Thailand eSIM picks.
Save the QR code, app login, order email, and manual activation details before you leave. If you are comparing providers first, the differences in app setup and destination pricing matter, so check Nomad vs Airalo, Holafly vs Airalo, or Airalo vs Nomad vs Saily.
Step 2: Add the eSIM on iPhone
Estimated time: 2-4 minutes. Open Settings, tap Cellular or Mobile Data, then tap Add eSIM. Follow your provider's method: scan a QR code, use its iPhone app, tap an activation link, or enter the SM-DP+ address and activation code manually.
Let the install finish before closing Settings. I've seen people break their own setup by deleting a profile because it looked inactive for a minute, and that can force a support ticket with the provider.
Step 3: Label Your Home Line and Travel Line
Estimated time: 1-2 minutes. Give each line a plain label, such as Home and Travel Data. Use your home line as the default voice line if you still need SMS verification, bank messages, or calls from your regular number.
Turn off Allow Cellular Data Switching if you want strict control. That setting can quietly move data back to the home carrier when the travel line is weak, which is exactly how surprise roaming charges happen.
Step 4: Switch Mobile Data After Landing
Estimated time: 1-3 minutes. After the plane lands, open Settings, go to Cellular or Mobile Data, and set Cellular Data to the travel eSIM. Then open the travel eSIM line and turn on data roaming if your provider requires it for the plan to connect.
Keep data roaming off on the home line unless you intentionally bought a roaming pass. For a quick cost check before you choose, compare the math in eSIM vs roaming cost or look at how cheap Europe eSIM plans compare after fees and limits.
Step 5: Test Data, Hotspot, and Messaging
Estimated time: 3-5 minutes. Turn off Wi-Fi briefly, load a web page, open maps, and send a message through your usual app. If the plan includes hotspot, test Personal Hotspot before you actually need it for a laptop.
Travelers working across countries should also keep a backup option. A regional eSIM, a second small plan, or a carrier day pass can make sense for heavy work trips, which is why our digital nomad eSIM guide focuses on fallback data and hotspot rules.
If the eSIM Does Not Activate
- Wait five minutes. Some providers need a short network registration window after you land.
- Restart the iPhone. A restart forces the modem to search again without deleting the plan.
- Check the selected data line. The travel eSIM can be installed but not actually selected for data.
- Confirm roaming rules. Many travel eSIMs need roaming on for the travel line, even though your home line should stay protected.
- Do not delete the eSIM first. Some QR codes are single-use. If you are stuck, use the troubleshooting steps in our iPhone eSIM activation fix guide before removing the profile.
Quick Checklist
- Confirm your iPhone supports eSIM and is carrier-unlocked.
- Buy the plan before departure and save the QR code or app login.
- Install over strong Wi-Fi, then wait for the setup screen to finish.
- Label the home and travel lines clearly.
- Keep home-line data roaming off unless you chose a roaming pass.
- Select the travel eSIM for mobile data after landing.
- Test web browsing, maps, messaging, and hotspot before leaving the airport.
Official Sources
For device requirements and setup methods, see Apple Support: Set up eSIM on iPhone. For travel-specific iPhone eSIM options, see Apple Support: Use eSIM while traveling internationally.
Frequently Asked Questions
how do i set up an esim on iphone for travel?
Buy a compatible travel plan, open Settings, tap Cellular or Mobile Data, choose Add eSIM, and follow the QR, app, link, or manual setup route from your provider. After landing, select that eSIM for mobile data.
should i install my travel esim before i leave?
Usually, yes. Install it on reliable Wi-Fi before departure, but read the provider's activation rule first because some plans start their validity period as soon as they are installed.
do i turn off my primary sim when using travel esim?
You do not have to turn it off if you still need calls or texts. Keep the primary line available for voice and SMS, but turn off data roaming on that home line to reduce roaming-charge risk.
why is my iphone esim installed but not working abroad?
The most common causes are the wrong data line, travel-line roaming turned off, weak local coverage, an activation window that has not completed, or a carrier-locked iPhone.
can i use imessage and whatsapp with a travel esim?
Yes. iMessage and WhatsApp can keep working over the travel eSIM's data connection. Keep your primary number active if you need SMS codes tied to that number.
Set up calmly, and the iPhone eSIM workflow is not hard. The trick is separating installation from data switching: install before the trip, label everything clearly, then make the travel line carry data only when you are ready to use it.